
Elephant Foot Fix
Correct swollen first layers, oversized bottoms, tight holes near the bed, and rounded lower edges.
Fix Z offset and bed temperature first, then use first-layer compensation or a small model chamfer for the remaining predictable expansion.

See the sequence before you start
Match the visible symptom, work through the four visual checkpoints, and prove the result with a small test.
Start fast or open every detail
Quick Fix keeps the safest first checks and proof steps in view. Full Guide reveals the complete settings, printer context, advanced tests, sources and FAQs.
Quick Fix mode is active.
Excess squish pushes material outward.
- Bottom edge is square.
- Hole/peg fit is consistent through height.
Use the smallest useful test, keep the winning change, and record the result.
Make this guide easier to apply to your setup
Select what you use. The page highlights relevant material, slicer and printer notes without hiding the complete source-backed guide.
Choose any setup details above to emphasize matching notes and produce a safer starting summary.
Know what to do now—and what comes next
Follow one controlled path. Do not stack unrelated changes before the proof test.
- 1Confirm the visual clue
Compare the failed area with the problem and target visuals.
- 2Run the safest first checks
Run the first safe check and change one variable at a time.
- 3Print the proof test
A small representative test no longer shows the original symptom.
- 4Escalate only if needed
Use the next-route guides only when the original symptom remains.
Which description is closest to what you see?
Select the closest match. This does not replace inspection; it moves the most relevant starting point to the front.
See the failure, understand the cause, and follow the correct repair order
This consistent visual story combines the issue-specific comparison, four repair checkpoints, verification criteria, and common causes. Open it full size, then use the source-backed guide below.
Select the image to open the full-resolution guide. Numeric values are safe starting ranges only; follow the detailed instructions and manufacturer limits for your equipment.
Responsive WebP delivery keeps the mobile guide readable without loading the full desktop image unnecessarily.
Before you change settings
- Confirm the exact printer, material, nozzle or resin, slicer, and recent hardware changes.
- Clean and correctly seat the build plate before adjusting Z offset or flow.
- Return extreme overrides to a known profile and change one variable at a time.
- Use a small calibration object or representative section before repeating a long print.
What it looks like
- Bottom edge flares outward
- Holes are tight only near the bed
- First layer has heavy ridges
- Part dimensions improve above the first layers
Most likely causes
- Nozzle too closeExcess squish pushes material outward.
- Bed temperature too highLower layers remain soft under weight.
- First-layer flow too highToo much material is deposited.
- No cooling or heavy part massBase deforms before solidifying.
- No model relief/chamferSharp designed edge has no process allowance.
Repair sequence
Work from top to bottom. Stop when the failure is resolved, verify it with a small test and record the successful setup.
- Step 1Run the nozzle-too-close test and correct Z offset.
- Step 2Return first-layer flow to the validated profile.
- Step 3Reduce bed temperature in small material-safe steps after adhesion is secure.
- Step 4Use normal cooling timing for the material.
- Step 5Apply slicer elephant-foot compensation conservatively.
- Step 6Add a small chamfer to the model when design control is available.
- Step 7Validate fit at the final print orientation.
Settings to review
| Setting | How to use it |
|---|---|
| First-layer compensation | Use only after height and temperature are correct. |
| Bed temperature | Lower carefully without losing adhesion. |
| Initial layer flow | Avoid using excess flow for adhesion. |
Material notes
Often solved by Z offset and bed heat.
Avoid over-squish and excessive adhesion.
Thermal control can complicate base tuning.
Printer context
Check bed seating, gantry alignment, belts, wheels and first-layer consistency across the plate.
Start with the official profile; inspect belt balance, input shaping, flow, pressure advance and chamber conditions.
Confirm delta calibration, tower movement, belt tension, effector stability and full-bed mapping.
Use resin-specific exposure, lift, support, temperature, wash, cure and protective procedures.
Where to look in the slicer
Quality, Strength, Speed, Support and Filament; use built-in calibration for temperature, flow and pressure advance.
Print, Filament and Printer Settings; inspect the layer preview before export.
Quality, Walls, Top/Bottom, Material, Speed, Travel, Cooling, Support and Adhesion.
Printer/resin profile, exposure, lift/retract, support contact, raft, hollowing and drain settings.
Controlled test method
Do not repeat the full print while guessing. Use a small test that reproduces the same feature and record the result.
- Save the current profile or photograph every relevant setting.
- Choose one suspected cause from the ranked list and change only the matching variable.
- Print the smallest useful test with the same material, nozzle, plate, and environment.
- Compare the result with the target visual, keep the winning change, and then test the real model.
Confirm the repair before repeating the full print
Use the final plate, material, mesh and first-layer profile.
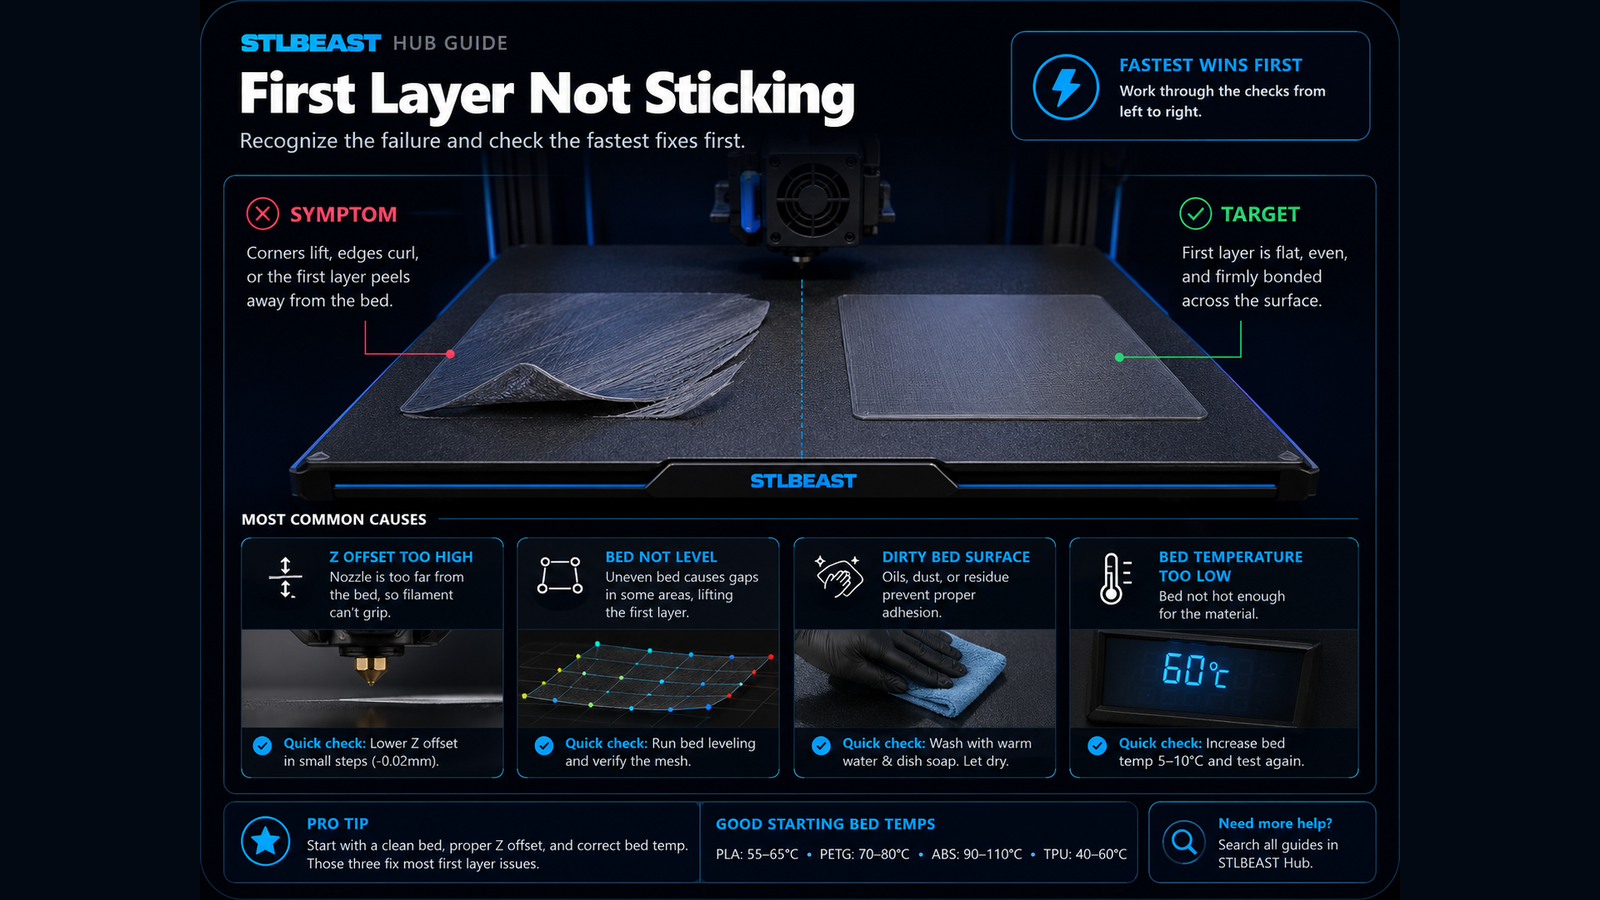
Lines join evenly in the centre and corners, with no scraping, gaps or lifting.
One or more zones remain loose, transparent, ridged or detached.
Recheck plate cleanliness, mesh, Z offset and first-layer flow in that order.
Recheck the visual diagnosis →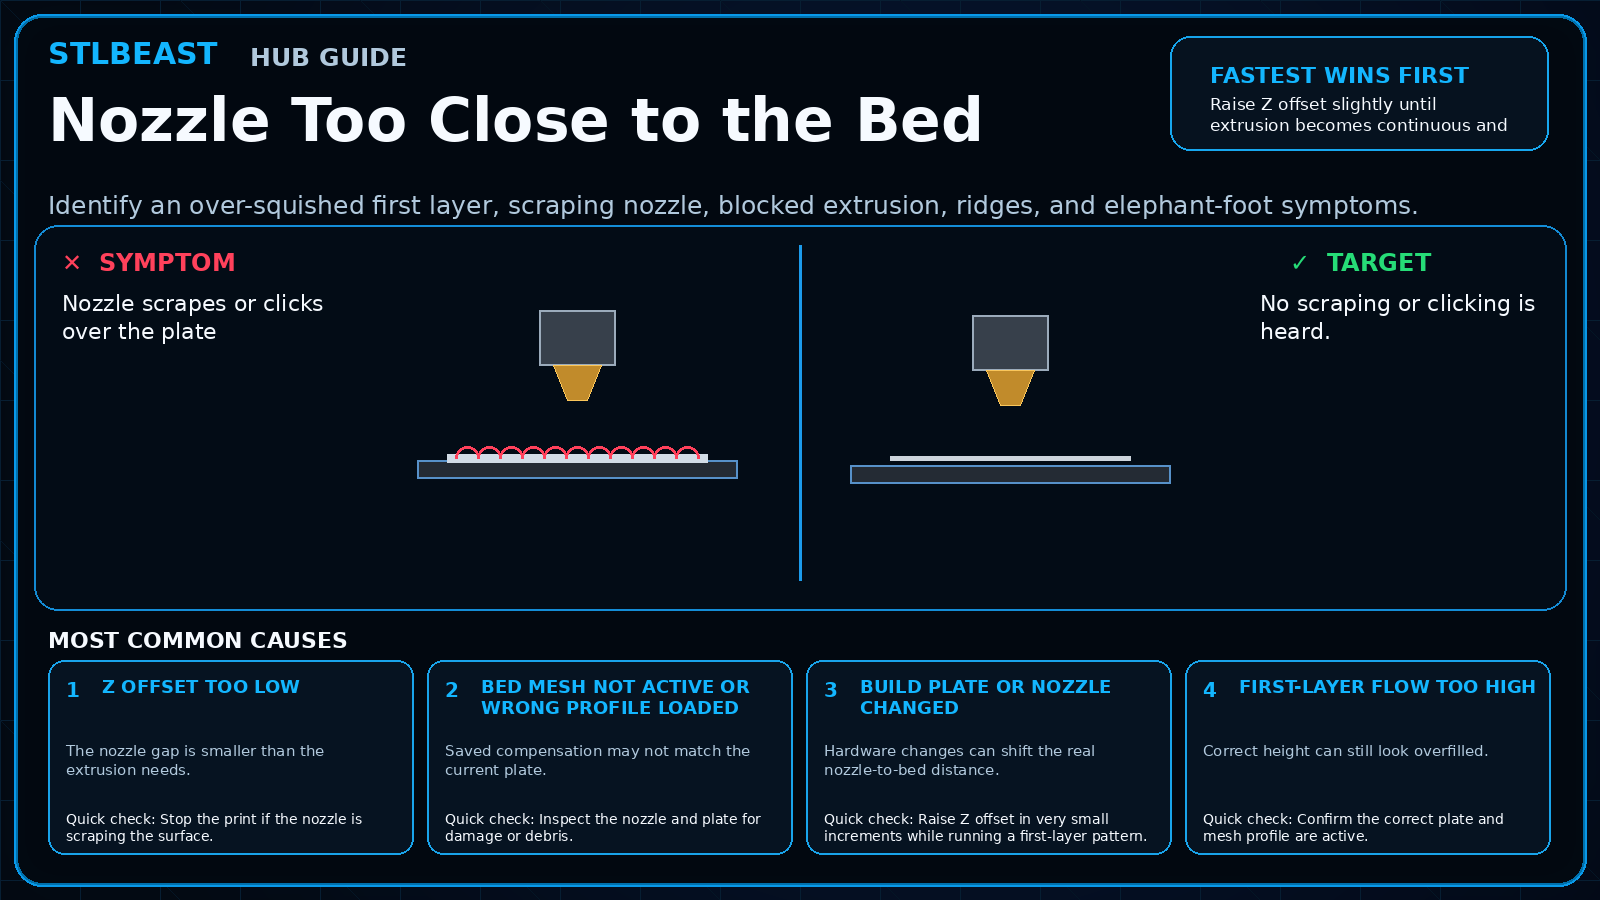 Next path 1Nozzle Too Close to the Bed
Open this related First Layer guide when the first repair path does not fully explain the remaining symptom.
Open this guide → Next path 2Bed Leveling and Z Offset Guide
Use this next when first-layer quality varies across the build plate.
Open this guide →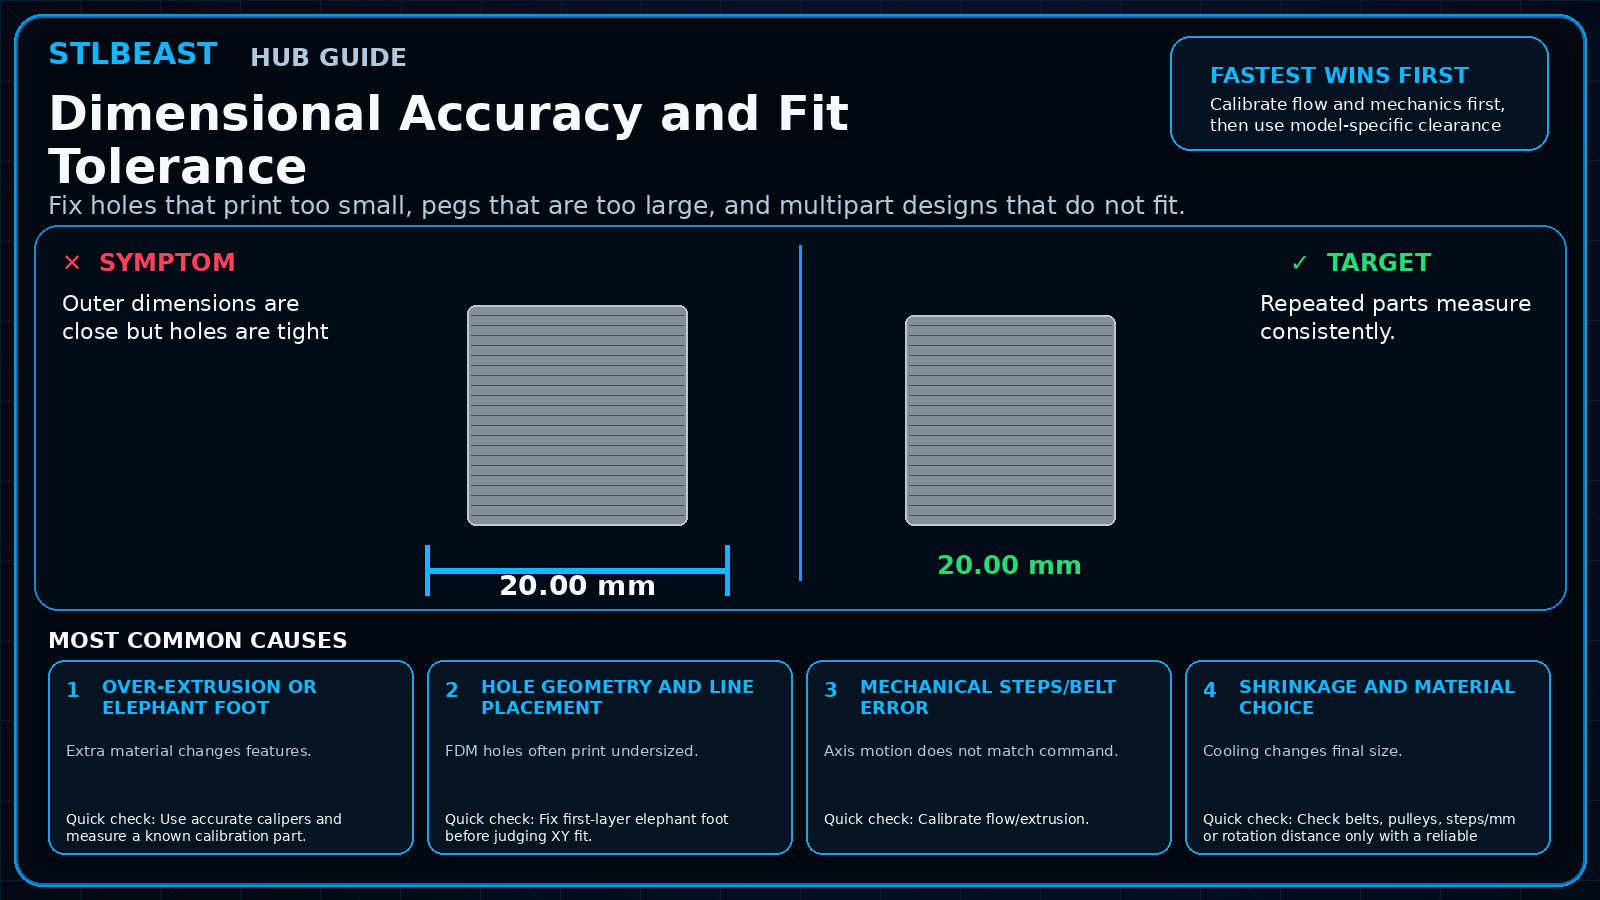 Next path 3Dimensional Accuracy and Fit Tolerance
Open this related Calibration guide when the first repair path does not fully explain the remaining symptom.
Open this guide →How to verify the fix
- Bottom edge is square.
- Hole/peg fit is consistent through height.
- Adhesion remains reliable.
- Compensation does not undercut the base.
Choose a result after the print so the guide can point you to the correct next action.
Prevent it next time
- Use a first-layer calibration pattern.
- Save plate/material profiles.
- Design a base chamfer for precision parts.
- Do not rely on very high bed heat for adhesion.
Useful public sample. Complete personalized profile for members.
Everyone can use the full guide and receive a safe starting sample. Members unlock all machine/material values, adjustment order, saved Profile Vault history and deeper AI Doctor linkage.
Sources and further reading
These references support the troubleshooting sequence. Follow the printer, slicer, filament, resin, and build-surface manufacturer limits for your exact equipment.
Frequently asked questions
Will elephant-foot compensation fix a scraping nozzle?
No. Correct Z offset first.
Why only on large parts?
More heat and weight can keep the base soft longer.
Can I sand it off?
Yes for one-off parts, but settings/design correction is better for repeatability.
Related fixes
Did this fix your print?
Your anonymous answer improves the guide order and AI Doctor paths.